

Hey guys!
I hope you are all now truly into the holiday spirit. I know I am! Gift buying almost done, tree up, decorations hung, Christmas cards written, some gifts wrapped and belting out the Christmas tunes. I am also onto my third Christmas read.
So, as I am sure you are aware, we have been counting down to Christmas with my daily advent calender posted every day on my Facebook page. I am having so much fun doing it and I thought in case you have been busy reading, writing or Christmas buying and might have missed it, I would do a round up of the week's posting. So here it is ~
 We kicked off the advent calender with a free Christmas read called Home for Christmas. Unfortunately it's no longer free but here are the UK and .Com links in case you would like to download ~
Home for Christmas UK link Kindle £1.92
Home for Christmas .Com link Kindle $3.14
 It's December so you are now officially allowed to eat mince pies! Here is a delicious recipe for you to try!
 Ingredients ~
240 grams plain flour
60 grams vegetable shortening
60 grams cold butter
juice of 1 orange
1 pinch of salt
350 grams of mincemeat
Icing sugar
For cranberry studded mincemeat ~ makes 21/2 cups
60 ml ruby port
75 grams soft dark brown sugar
300 grams of cranberries
1 teaspoon ground cinnamon
1 teaspoon ground ginger
75 grams of currants
75 grams raisins
30 grams dried cranberries
finely grated zest and juice of 1 clementine
25 ml brandy
3 drops of almond extract
1/2 teaspoon vanilla extract
2 tablespoons of honey
Method ~
Make the
mincemeat in advance. In a large pan, dissolve the sugar in the ruby port over
a gentle heat. Add the cranberries and stir. Add the cinnamon, ginger and
cloves, currants, raisins, dried cranberries and the zest and juice of the
clementine. Bring to a gentle simmer and cook for 20 minutes, or until the
fruit has broken down and has absorbed most of the liquid in the pan. (You may
need to squish the cranberries a little with the back of a wooden spoon to
incorporate them fully.) Remove from the heat and allow to cool a little. Add
the brandy, almond extract, vanilla extract and honey and stir well with a
wooden spoon to mash the mixture down into a paste. Spoon the mincemeat into
sterilised jars and, once cool, store in the fridge for up to two weeks.
Then once you are
ready to make your mince pies, get out a tray of miniature tart tins, each
indent 4.5cm / 2 inches in diameter, along with a 5.5cm / 2¼ inch fluted, round
biscuit cutter and a 4cm / 1¾ inch star cutter.
Measure the flour
into a shallow bowl or dish and, with a teaspoon, dollop little mounds of
vegetable shortening into the bowl, add the butter, diced small, shake to cover
it, then put in the freezer for 20 minutes. This is what will make the pastry
so tender and flaky later.Mix together the orange juice and salt in a separate,
small bowl, cover and leave in the fridge to chill.
After the 20
minutes, empty the flour and fat into the bowl of your food processor and blitz
until you’ve got a pale pile of porridge-like crumbs. Pour the salted juice
down the funnel, pulsing until it looks as if the dough is about to cohere; you
want to stop just before it does (even if some orange juice is left). If all
your juice is used up and you need more liquid, add some iced water.
If you prefer to
use a freestanding mixer to make the pastry, cut the fats into the flour with
the flat paddle, leaving the bowl in the fridge to chill down for the 20-minute
flour-and-fat-freezer session. Add liquid as above. I often find the pastry
uses more liquid in the mixer than the processor.
Turn the mixture
out of the processor or mixing bowl onto a pastry board or work surface and,
using your hands, combine to a dough. Then form into 3 discs (you’ll need to
make these in 3 batches, unless you’ve got enough tart tins to make all 36 pies
at once).
Wrap each disc in
clingfilm and put in the fridge to rest for 20 minutes. Preheat the oven to
220°C/gas mark 7/425ºF.
Roll out the
discs, one at a time, as thinly as you can without exaggerating; in other
words, you want a light pastry case, but one sturdy enough to support the dense
mincemeat. This is easy-going dough, so you don’t have to pander to it: just
get rolling and patch up as you need.
Out of each
rolled-out disc cut out circles a little wider than the indentations in the
tart tins; I use a fluted cookie cutter for this. Press these circles gently
into the moulds and dollop in a scant teaspoon of mincemeat.
Then cut out your
stars with your little star cutter – re-rolling the pastry as necessary – and
place the tops lightly on the mincemeat.
Put in the oven
and bake for 10–15 minutes: keep an eye on them as they really don’t take long
and ovens do vary.
Remove from the
oven, prising out the little pies straight away and letting the empty tin cool
down before you start putting in the pastry for the next batch. Carry on until
they’re all done.
Dust over some
icing sugar by pushing it through a tea strainer, and serve the pies.
My 1st of December Christmas Jingle ~ Everything's gonna be cool this Christmas
 Another freebie which is no longer free.
Winters Wonder Love UK link Kindle £0.77
Winters Wonder Love .Com link Kindle $1.26
 I absolutely love these. Reindeer cupcakes I really must give these a try!
Here's how ~
2. Frost with chocolate frosting.
3. Top with pretzels for the antlers, a Nilla Wafer for the face, white M&Ms for the eyes (or any other type of white candy), black icing for the eyeballs, and brown and red candies for the nose (peanut butter M&Ms and Cadbury chocolate balls).
2nd December Christmas Jingle (it's not Christmas without this tune!) ~ The Pogues ~ Fairytale of New York
 I have read this book and loved it. It's a Christmas Novella and the second book to The Beach Cafe. You can find my review here ~ Christmas at The Beach Cafe Review
 Christmas at The Beach Cafe UK link Kindle £0.59p
Christmas at the Beach Cafe .com link Kindle $0.96

These look nice. Almond cookies. If you like to bake, have a go. Here's how ~
Prep: 10 min. Bake: 10 min./batch + cooling
Yield: 36
Servings
Ingredients ~
1 cup shortening
1/2 cup plus 3
tablespoons sugar, divided
1/4 cup packed
brown sugar
1 egg
1 teaspoon almond
extract
2 cups
all-purpose flour
1-1/2 teaspoons
baking powder
1/8 teaspoon salt
3 tablespoons
sliced almonds
Method ~
In a small bowl,
cream the shortening, 1/2 cup sugar and brown sugar until light and fluffy.
Beat in egg and extract. Combine the flour, baking powder and salt; gradually
add to creamed mixture and mix well. Shape into 1-in.
balls. Roll in remaining sugar. Place 2 in. apart on ungreased baking sheets.
Flatten with the bottom of a glass. Press three almond slices into the center
of each. Bake at 350° for
9-11 minutes or until edges are lightly browned. Cool for 2 minutes before
removing to wire racks.
3rd December Christmas Jingle (in my top 3 fav Christmas songs!) ~ Jon Bon Jovi - Please come home for Christmas
 I have read Blue Christmas Balls and it really did have me laughing out loud. For a lighthearted fun short read I would recommend this. You can read my review here ~ Blue Christmas Balls Review
Blue Christmas Balls UK link Kindle £0.99p
Blue Christmas Balls .Com link Kindle $1.61

How tasty does this look? For the chocolate lover in your life, why not try this?
Ingredients ~
BROWNIE:
4 ounces
unsweetened chocolate, finely chopped
1 cup salted
butter, melted
2 cups light
brown sugar, packed
4 large eggs
2 teaspoons
vanilla extract
1 cup all-purpose
flour
1/2 cup mini-
chocolate chips
COOKIE DOUGH:
3/4 cup salted butter,
at room temperature
3/4 cup light
brown sugar, packed
3/4 cup
granulated white sugar
3 Tablespoons
milk
1 1/2 teaspoons
vanilla extract
1 1/2 cups
all-purpose flour
1 1/2 cups mini
chocolate chips
1/2 cup semisweet
chips + 1 teaspoon shortening for drizzle
Directions
Prepare the
brownies ~
Preheat oven to
325 degrees F.
Spray a 9×13-inch
pan with nonstick spray.
In a medium glass
bowl, melt chocolate in the microwave in short bursts of 30 seconds; stir after
each burst and remove from microwave when melted and smooth.
Set aside to cool
slightly.
In a large mixing
bowl, whisk together the butter and brown sugar.
Add the eggs and
vanilla extract and whisk those in too.
Mix in melted
chocolate.
Whisk in the
flour and mix just until combined (don’t over-mix).
Stir in the
chocolate chips.
Spread batter
into prepared pan.
Bake 25 to 35
minutes.
Watch closely and
remove from oven when toothpick inserted into the center comes out clean. Let
cool completely.
Prepare the
cookie dough ~
In a medium bowl,
use an electric mixer to combine butter, brown sugar and white sugar.
Mix in milk and
vanilla.
Mix in flour just
until combined.
Stir in chocolate
chips.
Spread cookie
dough over the cooled brownies.
Refrigerate until
the dough is quite firm. Use a sharp knife to cut the brownies.
To add chocolate
drizzle on top, melt 1/2 cup chocolate chips with 1 teaspoon of shortening in
the microwave; stir until smooth.
Scoop the melted
chocolate into a zip baggie and snip off the corner.
Squeeze the bag
to drizzle the chocolate on top of each brownie.
Sprinkle
additional chocolate chips on top.
4th December Christmas Jingle (can never resist the beautiful voice of MB) ~ Michael Buble - It's beginning to look a lot like Christmas

A free short story Christmas read. I have downloaded this myself but haven't read it yet.

These look tasty and if you want something away from the norm, then why not give them a try?
Pancake muffins ~
1 cup milk
6 eggs
1 cup flour
1/2 tsp. salt
1 tsp. vanilla
1 tsp. orange
zest (optional)
1/4 cup butter,
melted Preheat oven to 400 degrees F.
Blend first six ingredients (milk thru orange zest) in a blender. Be careful to see that any flour clumps get well-blended.
Blend first six ingredients (milk thru orange zest) in a blender. Be careful to see that any flour clumps get well-blended.
Blend in butter a
little at a time in order to temper the eggs.OR YOU CAN USE PANCAKE MIX
Grease muffin
tins well and distribute batter evenly between 24 tins. Bake for 15 minutes, or
until puffy and golden on top. While that is baking put your favorite berries
in a sauce pan on the stove top and warm through. Pull pancakes out and put on
a plate. Dust with powdered sugar 5. Carefully fill with warm gooey berries.
5th December Christmas Jingle (guilty pleasure!) ~ The Darkness - Christmas Time
 Massive fan of
the iHeart series and I cannot wait to read this! It's not free but you can
download it for just £3.56 I am sure it won't be a waste of money.
Massive fan of
the iHeart series and I cannot wait to read this! It's not free but you can
download it for just £3.56 I am sure it won't be a waste of money.
iHeart Christmas UK link Kindle

How cute are these? I might try these for the kids! Snowmen Cupcakes. Here's how ~
Ingredients ~
100g/4oz softened
butter or soft margarine
100g/4oz golden
caster sugar
2 eggs
100g/4oz self
raising flour
1 tsp baking
powder
1 tsp vanilla
essence
Icing sugar for
dusting (OR you can use a cake box mix)
150g/5oz
ready-to-roll white icing
3 tbsp apricot
jam
Marshmallows
Tubes of coloured
writing icing
Sugar baubles
(for cake decoration)
Method ~
Preheat the oven
to 180ºC/300ºF/gas mark 4. Place the softened butter or margarine, sugar, eggs,
flour, baking powder and vanilla essence into the bowl of an electric mixer.
Beat for a few minutes until the mixture is light in colour and fluffy. Line a bun tin
with eight paper cases and divide the mixture between them, filling the cases
to about two-thirds of the way up. Bake for about 20 minutes until the fairy
cakes have risen and are lightly golden. Lift the cakes (still in their paper
cases) out of the tins and leave them to cool on a wire rack. Dust a clean work
surface with icing sugar and roll out the icing to about 5mm/¼in thick. Cut out
eight circles using a small pastry cutter that is the same size as the top of
your cakes. Put the apricot jam into a small dish and stir in one tablespoon of
hot water. Brush this over the surface of the cakes and stick the circles of
icing on top. To decorate the
cakes, use marshmallows for the snowmen’s heads, black writing icing for the
eyes, red writing icing for the smiles and sugar baubles for noses (stick them
on with a blob of writing icing). Stick the heads on the cakes using a little
apricot jam, then stick on the edible baubles for buttons. You could wrap fizzy
lances around the snowmen’s necks for scarves.
6th December Christmas Jingle (suits the weather perfectly) ~ Tom Jones & Cerys Matthews - Baby it's cold outside
 Fancy having Christmas at the Gingerbread Cafe? It sounds good to me! Download this short festive story.
Christmas at the Gingerbread Cafe UK link Kindle £1.99
Christmas at the Gingerbread Cafe .Com link Kindle $3.26

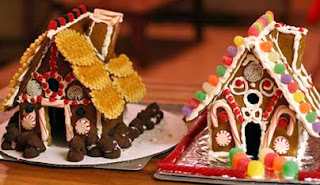
Today's recipe I got the inspiration from the ebook download. I mean Christmas just wouldn't be Christmas without a gingerbread house, would it? It's fun to make, certainly yummy to eat and a great way to get the children helping in the kitchen. My husband made one a few years back (see photo above). It wasn't quite made out of gingerbread, the inside was sponge cake, exterior was made out of marshmallows and for the roof he used Cadbury flake. The most yummy cake ever but it goes to show the possibilities are endless and you can chop and change any of it to suit you. If you would like to give it a go, here's how ~


 While the pieces
are still slightly warm, lay the pattern pieces over them and use a large
straight chef's knife to trim off any parts of the pieces that have through
cooking spread beyond the pattern.
While the pieces
are still slightly warm, lay the pattern pieces over them and use a large
straight chef's knife to trim off any parts of the pieces that have through
cooking spread beyond the pattern.
 This is where it
really helps to have more than two hands working on a house, and why making a
gingerbread house is so much more fun with company than alone. If you are
working on this alone, it may help to grab some canned goods from the pantry
and use the cans to help prop up the pieces while the icing mortar is drying.
This is where it
really helps to have more than two hands working on a house, and why making a
gingerbread house is so much more fun with company than alone. If you are
working on this alone, it may help to grab some canned goods from the pantry
and use the cans to help prop up the pieces while the icing mortar is drying.
 1 Pick a solid
base for your gingerbread house - either a flat cookie sheet, or a thick,
sturdy piece of cardboard. If you want, line the base with aluminum foil or wax
paper.
1 Pick a solid
base for your gingerbread house - either a flat cookie sheet, or a thick,
sturdy piece of cardboard. If you want, line the base with aluminum foil or wax
paper.
 2 Pipe a thick
line of icing along a short end of one of the side pieces. Press the iced side
piece against the edge of either the front or back pieces. Hold in place for a
few minutes until the icing is partially set. Repeat with the other side piece.
Prop up with cans if necessary. Repeat with the other short edges of the side
pieces and the remaining front/back piece. Pipe icing along the seams, inside
and outside of the house, to fill in any gaps and to add extra stability. Pipe
icing along the edges of the house where it meets the base. Let set for at
least an hour before attempting to add the roof pieces.
2 Pipe a thick
line of icing along a short end of one of the side pieces. Press the iced side
piece against the edge of either the front or back pieces. Hold in place for a
few minutes until the icing is partially set. Repeat with the other side piece.
Prop up with cans if necessary. Repeat with the other short edges of the side
pieces and the remaining front/back piece. Pipe icing along the seams, inside
and outside of the house, to fill in any gaps and to add extra stability. Pipe
icing along the edges of the house where it meets the base. Let set for at
least an hour before attempting to add the roof pieces.


 3 Once the royal
icing has dried enough so that the base structure is solid, you can go to work
on the roof. Pipe icing all along the top edges of the structure, front and
back and two sides. The roof pieces are a rectangular shaped. Place the roof
pieces so that the long ends of the rectangle are running along the top of the
house. It helps if you have two people working together to place the roof
pieces on the house at the same time so that they meet easily at the top
center, and extend out a little bit, forming an overhang at each end. Gently
hold the roof pieces in place for a few minutes until they are set enough so
they don't slide off when you remove your hands. Pipe the top seam of the house
with extra icing. Let the house stand for at least an hour, and preferably 8
hours before decorating.
3 Once the royal
icing has dried enough so that the base structure is solid, you can go to work
on the roof. Pipe icing all along the top edges of the structure, front and
back and two sides. The roof pieces are a rectangular shaped. Place the roof
pieces so that the long ends of the rectangle are running along the top of the
house. It helps if you have two people working together to place the roof
pieces on the house at the same time so that they meet easily at the top
center, and extend out a little bit, forming an overhang at each end. Gently
hold the roof pieces in place for a few minutes until they are set enough so
they don't slide off when you remove your hands. Pipe the top seam of the house
with extra icing. Let the house stand for at least an hour, and preferably 8
hours before decorating.
 Fancy having Christmas at the Gingerbread Cafe? It sounds good to me! Download this short festive story.
 Christmas at the Gingerbread Cafe UK link Kindle £1.99
Christmas at the Gingerbread Cafe .Com link Kindle $3.26


Ingredients ~
6 cups all
purpose flour
1/2 teaspoon
baking powder
4 teaspoons
ground ginger
4 teaspoons
ground cinnamon
1/2 teaspoon
ground cloves or allspice
1/2 teaspoon salt
1 1/2 sticks (12
Tbsp) butter, softened
1 1/2 cups packed
light brown sugar
2 large eggs
1 cup dark
molasses
1 Tbsp water
Method ~
Make the
Gingerbread Dough
1 Whisk together
the dry ingredients in a large bowl, set aside.
2 Using an
electric mixer, beat on medium speed the butter and brown sugar until fluffy
and well blended. Beat in the eggs, molasses and water until well combined.
3 Beat half of
the flour mixture into the molasses mixture until well blended and smooth. Stir
in the remaining flour. Knead (or use your mixer's dough hook) until well
blended. If dough is too soft, add a little more flour.
4 Wrap the dough
in plastic wrap and refrigerate at least two hours, preferably overnight. You
can make it up to 3 days ahead of time. Let sit at room temperature for at
least 10 minutes before rolling out.
Create and Cut
Out Pattern Pieces ~

Create a
gingerbread house pattern by cutting out pieces of stiff paper (like that of a
manila folder) or cardboard. I like cardboard because it's almost as thick as
the gingerbread house pieces will be, and you can create a house model easily
using the pieces. The following links are to gif images of the pattern that we
used to make these houses. They should print out with the correct proportions
(1 inch on the pattern = 1 inch in real life), but if not, the dimensions are
also given on the pattern so you can use a ruler and create your own.
Roof Pattern
Side and Chimney
Pattern
Front and Back
Pattern
Make the
Gingerbread House Pieces ~
1 Preheat oven to
350°F, with the oven rack in the middle. Have several flat cookie sheets ready,
preferably ones that you know will not warp in the oven heat.
2 Divide the
dough in two. Spread parchment paper or wax paper on a large flat surface for
rolling. Dust the paper lightly with flour. Working with one portion of the
dough at a time, use a rolling pin to roll out the dough to an even thickness
of 1/4-inch. Add a little flour to the surface of the dough, and check for
sticking as you roll it out. If it sticks to either your rolling pin or the
rolling surface, dust with more flour. If the rolled out dough is very soft,
you may want to freeze it for an hour before cutting out the patterns.
3 Rub a little
flour over the surface of the dough. Place the pattern pieces on the dough, as
many pattern pieces as will fit on the dough. Use a small sharp knife to cut
out the pattern pieces from the dough, wiping the knife surface clean
frequently. Depending on how soft the dough is, you may need to use scissors to
cut the wax paper or parchment paper. You can cut out the patterns through the
dough and parchment paper, placing the dough pieces with the paper directly on
the cookie sheets. If you are not using parchment paper or wax paper, you may
need to use a large metal spatula to transfer the dough pieces to a greased
cookie sheet. Space the pieces on the cookie sheet an inch apart from each
other. If dough pieces stretch during the transfer process, push them back into
shape.
You can cut out a
door and window(s) at this point, or you can wait until after baking, soon
after the pieces have come out of the oven while the cookies are still warm.
4 Bake in a 350°F
oven until the edges are just beginning to darken, 11-15 minutes for the large
pieces, 6-8 minutes for the small pieces. Rotate the cookie sheets half way
through the baking for more even browning. Remove the sheets to racks to cool,
about 15 minutes.
 While the pieces
are still slightly warm, lay the pattern pieces over them and use a large
straight chef's knife to trim off any parts of the pieces that have through
cooking spread beyond the pattern.
While the pieces
are still slightly warm, lay the pattern pieces over them and use a large
straight chef's knife to trim off any parts of the pieces that have through
cooking spread beyond the pattern.
Remove pieces to
cool directly on racks to cool completely.
Make Royal Icing ~
Royal icing is
not only used for decorating, but it is the mortar that holds the gingerbread
pieces together to form the house. The following proportions should make enough
icing for both the mortaring step and for decorating for one gingerbread house.
2 large egg
whites
2 2/3 cup powdered
sugar, divided
1 Whisk together
until smooth the egg whites and 1 1/3 cups of the powdered sugar.
2 If you are
planning to eat your gingerbread house, and are concerned about the safety of
raw eggs, you can microwave the egg white powdered sugar mixture for several
seconds (30-40) until the mixture reaches a temperature of 160 degrees, but not
higher than 175°F. You can also use pasteurized dried or liquid egg whites.
3 Add the
remaining 1 1/3 cup of powdered sugar to the sugar egg mixture. Using an
electric mixer, beat on high speed until the icing holds stiff peaks. If it
doesn't form stiff peaks, add more powdered sugar.
4 Place a
dampened clean towel over the bowl of royal icing. Keep this towel over the
icing to prevent it from drying out while you work with it.
5 When you are
ready to mortar or decorate, fill a pastry bag with the icing. If you don't
have a pastry bag, you can make your own with a re-sealable plastic freezer
bag, just cut off the tip (a small cut) of one of the corners of the bag.
Plastic or metal piping tips are available in supermarkets which you can also
use with a freezer bag, for more controlled piping.
Construct the
Basic House, Mortaring the Pieces Together with Royal Icing ~
 This is where it
really helps to have more than two hands working on a house, and why making a
gingerbread house is so much more fun with company than alone. If you are
working on this alone, it may help to grab some canned goods from the pantry
and use the cans to help prop up the pieces while the icing mortar is drying.
This is where it
really helps to have more than two hands working on a house, and why making a
gingerbread house is so much more fun with company than alone. If you are
working on this alone, it may help to grab some canned goods from the pantry
and use the cans to help prop up the pieces while the icing mortar is drying. 1 Pick a solid
base for your gingerbread house - either a flat cookie sheet, or a thick,
sturdy piece of cardboard. If you want, line the base with aluminum foil or wax
paper.
1 Pick a solid
base for your gingerbread house - either a flat cookie sheet, or a thick,
sturdy piece of cardboard. If you want, line the base with aluminum foil or wax
paper. 2 Pipe a thick
line of icing along a short end of one of the side pieces. Press the iced side
piece against the edge of either the front or back pieces. Hold in place for a
few minutes until the icing is partially set. Repeat with the other side piece.
Prop up with cans if necessary. Repeat with the other short edges of the side
pieces and the remaining front/back piece. Pipe icing along the seams, inside
and outside of the house, to fill in any gaps and to add extra stability. Pipe
icing along the edges of the house where it meets the base. Let set for at
least an hour before attempting to add the roof pieces.
2 Pipe a thick
line of icing along a short end of one of the side pieces. Press the iced side
piece against the edge of either the front or back pieces. Hold in place for a
few minutes until the icing is partially set. Repeat with the other side piece.
Prop up with cans if necessary. Repeat with the other short edges of the side
pieces and the remaining front/back piece. Pipe icing along the seams, inside
and outside of the house, to fill in any gaps and to add extra stability. Pipe
icing along the edges of the house where it meets the base. Let set for at
least an hour before attempting to add the roof pieces.

If any of the
gingerbread house pattern pieces breaks, as can happen easily when working with
what are essentially cookies, most likely you can repair them. On my house I
forgot to cut out the door and window until the front piece had almost
completely cooled. When I went to make the cuts, the piece broke. Fortunately,
it was easy to mortar back together with royal icing. We even created a
"splint" out of cardboard and used royal icing to hold the splint to
the piece. Let harden completely before using the piece for the house construction.
When it comes time to decorate, you can pipe icing right over the broken seam
and no one will be the wiser.

 3 Once the royal
icing has dried enough so that the base structure is solid, you can go to work
on the roof. Pipe icing all along the top edges of the structure, front and
back and two sides. The roof pieces are a rectangular shaped. Place the roof
pieces so that the long ends of the rectangle are running along the top of the
house. It helps if you have two people working together to place the roof
pieces on the house at the same time so that they meet easily at the top
center, and extend out a little bit, forming an overhang at each end. Gently
hold the roof pieces in place for a few minutes until they are set enough so
they don't slide off when you remove your hands. Pipe the top seam of the house
with extra icing. Let the house stand for at least an hour, and preferably 8
hours before decorating.
3 Once the royal
icing has dried enough so that the base structure is solid, you can go to work
on the roof. Pipe icing all along the top edges of the structure, front and
back and two sides. The roof pieces are a rectangular shaped. Place the roof
pieces so that the long ends of the rectangle are running along the top of the
house. It helps if you have two people working together to place the roof
pieces on the house at the same time so that they meet easily at the top
center, and extend out a little bit, forming an overhang at each end. Gently
hold the roof pieces in place for a few minutes until they are set enough so
they don't slide off when you remove your hands. Pipe the top seam of the house
with extra icing. Let the house stand for at least an hour, and preferably 8
hours before decorating.
4 The chimney.
The dimensions of the chimney can be a bit tricky because of the angle of the
roof. Although you may have cut your chimney out of a pattern, these small
pieces likely have spread a bit through cooking, and you may have to use a
chef's knife to cut the pieces and adjust the angles of the pieces so they
align better with the roof. It's easiest to assemble the chimney first upside
down, separate from the house. Pipe the pieces together with royal icing and
let set until stable. Then, turn the chimney right-side-up and attach it to the
roof using piped royal icing. You can do this either right after the house has
initially set (1 hour after assembly) or later, during the decorating process.
Decorate the
Gingerbread House ~
This step
requires a trip to the candy section of your local grocery store. You can
decorate your house with whatever types of candy pleases you. Be careful taking
kids along to the store however, as you will invariably buy more candy than you
actually need (though they do have the best ideas of what candies would be good
for various decorative effects). Red hots are really practical, as are small
gumdrops, and candy canes. Audrey used a whole bag of chocolate truffles for
the stone wall around her house, and some type of waffle-patterned cookies for
roof tiles. Pipe royal icing
to make decorative designs around the walls of the house and roof. Use royal
icing to "glue" pieces of candy to the house.

7th December Christmas Jingle (my fav Christmas song ever by my fav artist, although Kylie's cover is pretty good too!) ~ Santa Baby - Madonna
If you are taking part in the Christmas Like for Like event then remember to pop back and get those after you. If you are not taking part, it's not too late. Nip over and join up. More the merrier. Invite, RT and share! Let's support each other this Christmas.
To take part in the countdown to Christmas check out my daily advent calender by popping by my page every day!
No comments:
Post a Comment